Overview
The Newsletter section invites customers to join your email list, for example Join our Newsletter. It shows a heading, a short text and an email signup form in a panel, with an image on each side. Customers who subscribe are added to your Shopify customer list with email marketing consent, so you can email them from Shopify Email or your email app.
How to use
- Go to Online Store → Themes → Customize.
- Click Add section → Newsletter, or select an existing one.
- Edit the Heading and Text, for example Join our [Newsletter] and your offer.
- Select each Image block and upload a picture for the left and right sides.
- Select Signup form to set the button label and consent text.
- Under Frame, turn the outer frame on or off, and choose the frame and panel color schemes, corner radius, height and content width.
- Under Images, set the Image width and choose whether to show the images on mobile.
- Set the Section width and Padding.
- Click Save.
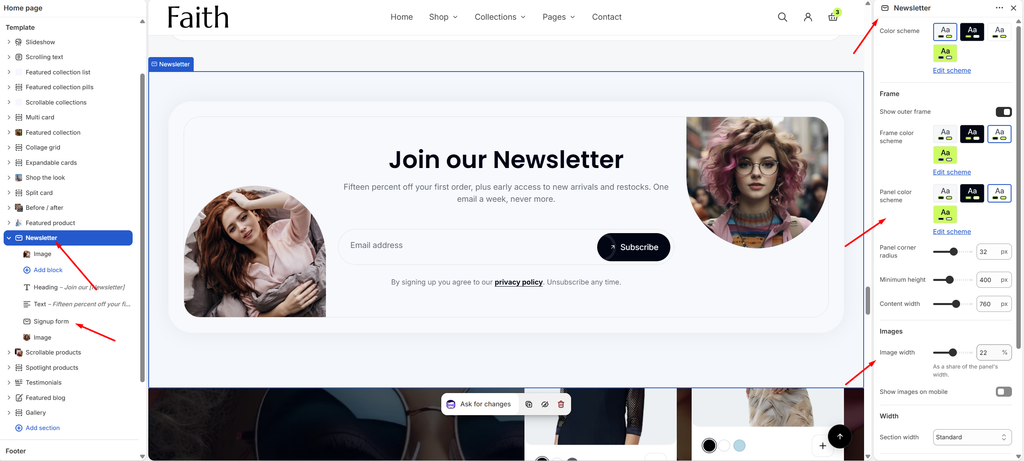
Settings
| Settings | Description |
|---|---|
| Color Scheme | Select a predefined color scheme for the section background. |
| Show Outer Frame | Show a framed border around the newsletter panel. |
| Frame Color Scheme | Appears when Show outer frame is on. Select the color scheme of the outer frame. |
| Panel Color Scheme | Select the color scheme of the panel that holds the heading, text and form. |
| Panel Corner Radius | Customize the rounded corners of the panel (0–60 px). |
| Minimum Height | Set the minimum height of the panel (200–700 px). |
| Content Width | Set how wide the heading, text and form can grow (400–1000 px). |
| Image Width | Set the width of each side image as a share of the panel’s width (12–32%). |
| Show Images on Mobile | Show the side images on phones. When off, phones show only the text and form. |
| Section Width | Set how wide the section is. Options include Same as theme, Full width, Wide, Standard, Narrow and Custom. |
| Custom Section Width | Appears when Section Width is set to Custom. Set an exact width (600–2000 px). |
| Padding | Choose Desktop or Mobile under Devices, then adjust the Top and Bottom spacing of the section for that device. |
Tip: To see who subscribed, go to Customers in your Shopify admin and filter by Email subscription status: Subscribed.
Image Block
Overview
The Image block is the picture shown on one side of the panel. The section has two Image blocks: one on the left of the form and one on the right. They cannot be removed. Leave an Image empty to hide that side.
How to use
- Expand Newsletter and select an Image block.
- Click Select to choose an image.
- Repeat for the second Image block.
- Click Save.
Settings
| Settings | Description |
|---|---|
| Image | Upload or select the image for this side of the panel. Portrait images work best. |
Signup Form Block
Overview
The Signup form block is the email field with the Subscribe button and a consent line under it. It validates the email address and shows a success or error message in place. This block is part of the section and cannot be removed.
How to use
- Expand Newsletter and select Signup form.
- Enter the Button label, or leave it empty to use Subscribe.
- Turn Show button icon on or off.
- Edit the Consent text and link it to your privacy policy.
- Click Save.
Settings
| Settings | Description |
|---|---|
| Button Label | Set the text on the button. Leave it empty to use Subscribe. |
| Show Button Icon | Show a small arrow icon on the button. |
| Consent Text | Add the line shown under the field, for example By signing up you agree to our privacy policy. Link it to your policies. |